19 August, 2017

Add a new CSS class in RTE


There are two simple steps involved in order to add a new CSS class in RTE.

  1.  Add <class>  element in Website\sitecore\shell\Controls\Rich Text Editor\ToolsFile.xml :

  2.  Now add the definition of that CSS class in Website\default.css file:

  3.  Make sure to delete the cache, and you can see newly added customeClass CSS class in rich text editor drop-down.

I hope that was helpful for you! Please do not hesitate to comments or contact me if you have any question. 🌺

Baraa Masri
Email: Bmasri@tanasuk.com
Twitter: @Bara_Masri

27 June, 2017

Sitecore Automatic Publish


 One of the built-in feature in Sitecore is the ability to automate publishing which allows authors to use publishing restrictions and release content in 
specific time or any time in the day, regardless of office hours.

  Enable scheduled publishing

 At sitecore.config file, set up a publish agent to run on a specific interval “Sitecore.Tasks.PublishAgent”, also you can change other options like languages, target and source database. This will perform a publish for whole Publish.Queue table (incremental mode) in the database. Basically, all item that have been modified and have no publish restrictions will be published from the source database to the target database. If you wish to perform scheduled publish only for specific items, not the whole database, make sure to set up publishing restrictions on items


  Configures publishing Timing

 Using the button ribbon [Publish > Change Button in ribbon > Publishing Settings dialog box] you can configure future publish date for an item (from and to) by setting the “Publishable From” and “Publishable To” date and time properties for an item.
Note: The same functionality is provided by the fields at the “Publishing” section for the item.


  Set up publishing restrictions on items

 It’s not recommended to enable automatic publishing for sites which don’t have proper item restrictions. Below restrictions can be apply to items so it will not be affected when run scheduled publish:  
  1.  Workflow, any item is not in final workflow state, will not be affected by auto publish.
  2.  Also from button ribbon [Publish > Change Button in ribbon > Publishing Settings dialog box], you can change publish restrictions for item versions.
  3. At the “Publishing” section of the item, select “Never publish” option.


I hope that was helpful for you! Please do not hesitate to comments or contact me if you have any question. 🌺

Baraa Masri
Email: Bmasri@tanasuk.com
Twitter: @Bara_Masri

22 May, 2017

Sitecore localization for RTL language support


  When setting up multilingual websites in Sitecore, some languages required RTL alignment support, where specification states that all elements should be right aligned, like Arabic, German and Chinese.

  As we are in Tanasuk the first and largest Middle East based Sitecore team that support regional implementations, especially for Arabic language. I will cover in this blog couple of challenges and tips regard designing a RTL language website.

  Light-to-left website is not just a ‘flipped’ version of a left-to-right (LTR) version, or this is not just a case of aligning text to the right; the direction of the text should read right-to-left as well, also considering the order of items must be changed into right to left.

  In the Sitecore Content Editor, all input fields should be switched to RTL direction, and add a new language then creating an Arabic version for example of an existing item is not enough and does not change input fields to RTL, which means that Sitecore doesn't support Right-to-left.

The illustration below shows how content should looks left-to-Right vs Right-to-left:


Left to Right alignment for English 
Right to left alignment for Arabic


Creating Right-to-Left User friendly Interfaces:

  1. Add HTML global dir attribute "dir=rtl". This sets the base direction for the overall document direction right-to-left, all block elements page and table layout in the document will inherit this setting unless the direction is explicitly overridden
  2. Mirroring your layout; that things on the left should be on the right and vice versa. This includes floats, ::before and ::after elements, margins and padding, and order of html elements. To achieve that, create / apply a stylesheet for each direction.
  3. If you are going to use the same web font for all pages, make sure it is compatible with all of them.


The following is an example demonstrate how to apply above points when switch to Arabic language using backend code:


I hope that was helpful for you! Please do not hesitate to comments or contact me if you have any question. 🌺

Baraa Masri
Email: Bmasri@tanasuk.com
Twitter: @Bara_Masri

20 April, 2017

Unable to add background image issue in Sitecore Rich Text Editor


Recently I was working on project built with Sitecore 8.1 update 1, and I faced issue with Rich text editor prevent me from create HTML content with background image :
  • Add  HTML that contains div with background image using " HTML editor ":
  • Then switch to " Show editor or try to edit anything, the background automatically trimmed from content into this :


However, I tried to add url link to the background image, but I had the same issue. So I contacted the Sitecore support, and they provided a solution and .dlls fix, also this issue has registered as a bug with reference number 145733 in Sitecore.

Solution:

  Sitecore uses a third party component from Telerik for its rich text editor, and using a more recent version of Telerik libraries helps to solve the issue. 
  1. Download dll files [ Telerik.Web.UI.zip ] and [ Telerik.Web.UI.Skins.zip] from link https://goo.gl/8tvb5N
  2. Extract .dll files and copy into your /bin folder, replacing the old assemblies;
  3. Edit your web.config files in the following way:
....

<runtime>
    <assemblyBinding xmlns="urn:schemas-microsoft-com:asm.v1">

       <dependentAssembly>
        <assemblyIdentity name="Telerik.Web.UI" publicKeyToken="121fae78165ba3d4" />
        <bindingRedirect oldVersion="2015.1.401.45" newVersion="2017.1.118.45" />

      </dependentAssembly>


      <dependentAssembly>
        <assemblyIdentity name="Lucene.Net" publicKeyToken="85089178b9ac3181" />
        <bindingRedirect oldVersion="0.0.0.0-2.9.4.0" newVersion="3.0.3.0" />
      </dependentAssembly>

....


I hope that was helpful for you ! please do not hasitate to comments or contact me if you have any question. ðŸŒº


Baraa Masri
Email: Bmasri@tanasuk.com
Twitter: @Bara_Masri


21 March, 2017

Custom Device Editor


What if we were able to view data source path for each rendering in Device Editor Dialog without having to navigate each time to the rendering properties window?  That would be really helpful and time-efficient for developers and content editors!

Sitecore gives developers the ability to override XML controls used in Sitecore.Client and add any custom logic, such as changing the control’s appearance or behavior. In this blog post, I will explain how to customize Device Editor and add this feature.  


1.       Add new Visual Studio Project of the type Class Library, Im going to call it CustomDeviceEditor

2.       From Sitecore.Client assembly, copy the class Sitecore.Shell.Applications.Layouts.DeviceEditor.DeviceEditorForm to the new solution and make sure to Inherit DialogForm class from Sitecore.Web.UI.Pages assembly.

3.       In the new class RenderRenderings method, implement custom code to read and view the data source information:


4.    Notice that I did not touch or change anything in the existing class  from Sitecore.Client, all the work had been done in a separate project, where it was compiled and placed in the \bin folder.

5.    Copy the Device Editor Xml files provided by Sitecore from folder (\Website\sitecore\shell\Applications\Layouts\DeviceEditor) to the bath folder (\Website\sitecore\shell\Override\Applications\Layouts\DeviceEditor).

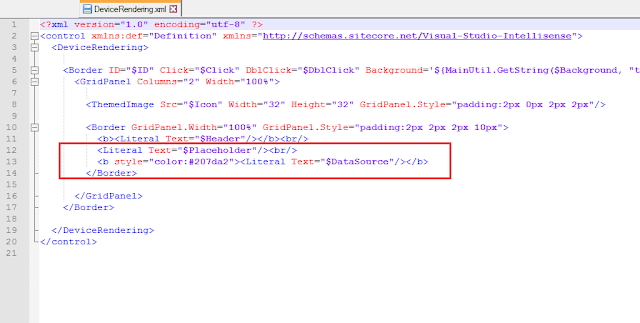
6.        In the new DeviceRendering.xml, add the Data Source literal html field to show the data-source path under the sublayout name and placeholder key:


7.        Finally, update the CodeBeside from the control  in the override folder to point to the new class:


 So how these changes affected the Sitecore Content Editor?  Simply when add these two updated xml files under the Sitecore Override folder: (\Website\sitecore\shell\Override\Applications\Layouts\DeviceEditor), Sitecore will automatically start reading the new Customized Device Editor xml files with the new assembly and ignore the standard one! ðŸ˜Š

How to Install Package:

Sitecore Module:
https://marketplace.sitecore.net/Modules/C/Custom_Device_Editor.aspx

Package 1: It works and is tested on Sitecore 8.1, 8.1.1, 8.1.2 and 8.1.3
Source code link: https://github.com/BaraaMasri/Custom-Device-Editor-SC81.git


Package 2: It works and is tested  on Sitecore 8.2, 8.2.1, 8.2.2
Source code link: https://github.com/BaraaMasri/Custom-Device-Editor-SC82.git

  1. Download the compatible packages with your Sitecore version.
  2.  Back up files in the folder \Website\Sitecore\shell\Override and \Website\sitecore\shell\Applications\Layouts\DeviceEditor. - Note that this is not required, but it is a good idea to have a backup ðŸ˜‰ -
  3.  Install the packages using Sitecore Installation Wizard.
  4. The installed packages will
    .  Add CustomDeviceEditor.dll assembly to \bin folder,
    .  Add new xml files DeviceRendering.xml and DeviceEditor.xml under the folder path    \Website\sitecore\shell\Override\Applications\Layouts\DeviceEditor.

How to Uninstall Package:

Whenever you want to stop or uninstall this feature, follow the steps stated below, and Sitecore will revert to the standard assembly :
  1.  Remove DeviceEditor.xml and DeviceRendering.xml from folder \Website\sitecore\shell\Override\Applications\Layouts\DeviceEditor 
  2. Remove CustomDeviceEditor.dll from \bin folder

I hope you enjoyed my post. If you have any feedback, please don't hesitate to comment or contact me! ðŸŒº

Baraa Masri
Email: Bmasri@tanasuk.com
Twitter: @Bara_Masri