What if we were able to view data source path for each rendering in
Device Editor Dialog without having to navigate each time to the rendering
properties window? That would be really helpful and
time-efficient for developers and content editors!
Sitecore gives developers the
ability to override XML controls used in Sitecore.Client
and add any custom logic, such as changing the control’s appearance or behavior.
In this blog post, I will explain how to customize Device Editor and add this
feature.
1.
Add new Visual Studio
Project of the type Class Library, Im going to call it CustomDeviceEditor
2.
From Sitecore.Client assembly, copy the class Sitecore.Shell.Applications.Layouts.DeviceEditor.DeviceEditorForm
to the new solution and make sure to Inherit DialogForm class from Sitecore.Web.UI.Pages assembly.
3.
In the new class RenderRenderings method, implement custom code to read and view the data source
information:
4. Notice that I did not touch or change anything in the existing class from Sitecore.Client, all
the work had been done in a separate project, where it was compiled and placed in
the \bin folder.
5. Copy the Device Editor Xml files provided by Sitecore from folder (\Website\sitecore\shell\Applications\Layouts\DeviceEditor) to the bath folder (\Website\sitecore\shell\Override\Applications\Layouts\DeviceEditor).
6.
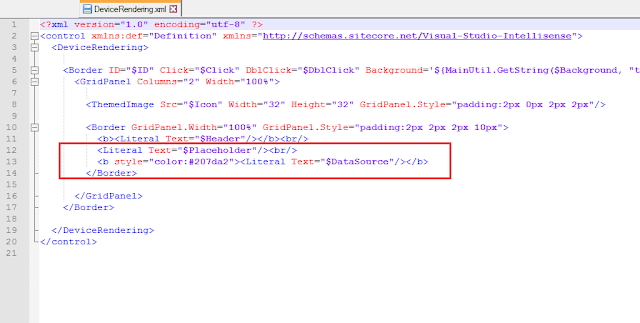
In the new DeviceRendering.xml,
add the Data Source literal html field to show the data-source path
under the sublayout name and placeholder key:
7.
Finally, update the CodeBeside from the control in the override folder to point to the
new class:
So how these changes affected the Sitecore
Content Editor? Simply when add these
two updated xml files under the Sitecore Override folder: (\Website\sitecore\shell\Override\Applications\Layouts\DeviceEditor),
Sitecore will automatically start reading the new Customized Device Editor xml
files with the new assembly
and ignore the standard one!
How to Install
Package:
Sitecore Module:
https://marketplace.sitecore.net/Modules/C/Custom_Device_Editor.aspx
Sitecore Module:
https://marketplace.sitecore.net/Modules/C/Custom_Device_Editor.aspx
Source code link: https://github.com/BaraaMasri/Custom-Device-Editor-SC81.git
Source code link: https://github.com/BaraaMasri/Custom-Device-Editor-SC82.git
- Download the compatible packages with your Sitecore version.
- Back up files in the folder \Website\Sitecore\shell\Override and \Website\sitecore\shell\Applications\Layouts\DeviceEditor. - Note that this is not required, but it is a good idea to have a backup 😉 -
- Install the packages using Sitecore Installation Wizard.
- The installed packages will
. Add CustomDeviceEditor.dll assembly to \bin folder,
. Add new xml files DeviceRendering.xml and DeviceEditor.xml under the folder path \Website\sitecore\shell\Override\Applications\Layouts\DeviceEditor.
How
to Uninstall Package:
Whenever you want to stop
or uninstall this feature, follow the steps stated below, and Sitecore
will revert to the standard assembly :
- Remove DeviceEditor.xml and DeviceRendering.xml from folder \Website\sitecore\shell\Override\Applications\Layouts\DeviceEditor
- Remove CustomDeviceEditor.dll from \bin folder
I hope you enjoyed my post. If you have any feedback, please
don't hesitate to comment or contact me! 🌺
Email: Bmasri@tanasuk.com
Twitter: @Bara_Masri


I want to implement same functionality on Layout Details page(click Presentation Tab=>click Details=>Layout Details page opens).
ReplyDeleteI want to implement same functionality on Layout Details page(click Presentation Tab=>click Details=>Layout Details page opens). How can I do this?
ReplyDeletePlease suggest.
Hi Arun,
ReplyDeleteyou can find xml file responsible to show "Layout Details page dialog" at Sitecore folder:
\sitecore\shell\Applications\Layouts\DeviceEditor\LayoutFieldDevice.xml
then you have to make the same steps in the blog, by copying to Override folder, locate the class and functions and implement the logic you need.